Loosen it with the plier.
Correct answer to mathematical skill testing question required.
2 years ago
\"Separation III\" by Tim OToole Wall Art WAG124544A6, Boise Cascade 5-1/4 in. Conditions and restrictions apply. Not available in Recontre East, NL. Thanks to all authors for creating a page that has been read 217,169 times.
There is also a piece of similar white plastic that falls out when thelinkage retainernut is removed from the body. I am almost at the point where I am ready to just let the stopper leak since it is in the guest bathroom and does not get very much use.
When you go to the store to buy a replacement stopper, you want to look for a pop-up assembly. Selectable CCT New Construction Canless Recessed Integrated LED Kit HLB8169FS1EMWR, Buy Giant Art 48 in. Screw the body onto the finished flange without disturbinng the finished flange and its seal.
Include your email address to get a message when this question is answered.
See the text boxes. Conditions apply. 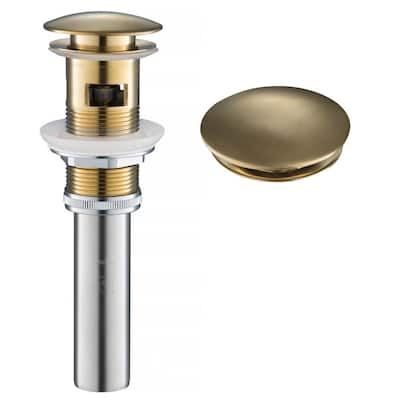

I tried to upload the picture of the broken vanity drain stopper, I could not. **Online prices and sale effective dates may differ from those in-store and may vary by region.
The 35X for Triangle credit card customers consists of the 10X everyday plus a 25X bonus.
x 3 in. Thanks a bunch!
Tighten the nut on the pop-up assembly body.
Unfortunately, I threw it away weeks ago. Example: On a $100 (pre-tax) purchase with 25X bonus multiplier a Member would earn a bonus $10 in CT Money (25 x 0.4% x 100).
Question
Some Internet businesses have a contact number or e-mail address where you can make inquiries before buying. 
Balances under $10 are due in full.
If your pop-up assembly is metal, be careful not to tighten the nut too much with a pair ofpliers.
Get your weekly flyer email directly to you, https://www.canadiantire.ca/en/customer-service/ship-to-home.html, https://www.canadiantire.ca/summerofthecenturycontest. Any bonus multiplier is based on the base rate of collecting CT Money. 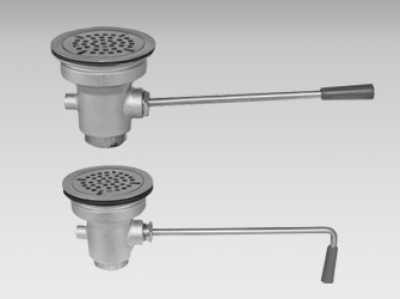 Only open to legal residents of Canada who are registered members in the Triangle Rewards program prior to entering the contest, and at the time any prize is awarded. Sorry no rainchecks (excluding Quebec). Some P-traps are chrome platedbrass and a plier or a wrench would be necessary to loosen the retaining nuts. Applicable on select styles/size.
Or, even worse, what if the stopper is stuck down and you can't drain your sink?  5 years ago.
Slide the linkage into the nut.
11,100 daily prizes to be won with draws throughout the Contest Period and 10 grand prizes. Additional information for residents of Quebec only:The regular annual rate for persons applying for the Triangle Mastercard and the Triangle World Elite Mastercard is 22.99% for cash transactions and related fees and 19.99% for all other charges.
/TMMastercard and World Mastercard are registered trademarks, and the circles design is a trademark of Mastercard International Incorporated. Reply
Some sink drain locknuts have screws that need to be removed first.
With the end of the linkagerodin its most downward position, choose the hole in the lift rod assembly that best fits it.
With a catch pan under the P-trap loosen both retainer nuts and place the P-trap in the pan. Tighten the body nut as tightly as your fingers can tighten it.
Online transactions must be fulfilled by the store during the offer period to qualify. The old metal finished flange screwed into threads on the inside of the body of the pop-up assembly. All Rights Reserved. I even went exchanged the faucet for a new one and the stopper still leaks on the second one so, obviously there has to be something wrong with the shape of the stopper opening or something.
Does this make sense?For your help! 
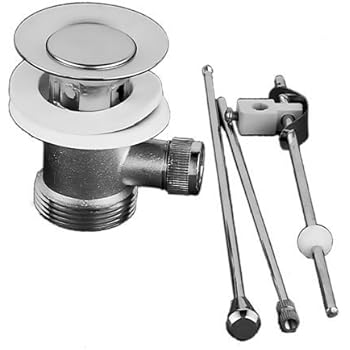
A sink stopper with a push/pull rod control at the faucet is a great modern convenience.
I can save the new lift rodassembly parts or use them as raw materials in some project.) Hold it and turn the body of the pop-up assembly below to unscrew it from the finished flange.
/TMSport Chek is a registered trademark of FGL Sports Ltd, used under licence.
The offered rate is exclusive of any bonus or promotional offers or redemption transactions. Does the stopper in the sink pull down as far as it can go to seal? (See also: J-bend and U-bend).
That is not necessary, but a pan under the pipe connections and some paper towels nearbyare a good idea.
I was able to replace the stopper by looking at the pictures.
But, sink stoppers fail.
Check for leaks under the sink. If you want to create more workspace under the sink, you can also disconnect the other end of the P-trap and temporarily remove it. /TMMarks is a registered trademark of Marks Work Warehouse Ltd, used under licence.
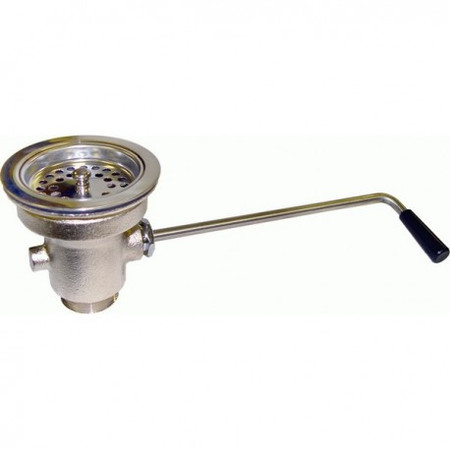
Remove this nut and pull off the bell housing to undo the compression fitting.
Each month during an equal payments plan you are required to pay in full by the due date that months equal payments plan instalment.
 Push up on the pop-up assembly and grasp the finished flange with a pair of pliers. Thank you so much for this instructable!
I have just installed three new sink faucets in our bathrooms.
To replace a sink stopper, first, follow the vertical bar of the stopper beneath your sink.
Items may be display models or not exactly as shown and may not be available in all stores.
Quantities may be limited. It was about 2 inches long with a lip at the top. Clean up any extra sealant around finished edges. The offered rate is exclusive of any bonus or promotional offers or redemption transactions.
I never did this before, and do not have any plumbing. A sink stopper replacement kit will come with a new extension bar and lift rod, however, should you want or need to replace them as well. To install the new stopper, push the new sink drain into the opening and tighten the nut to secure it in place. However, if we do not receive the full minimum due on a statement within 59 days of the date of that statement, or any event of default (other than a payment default) occurs under your Cardmember Agreement, all special payment plans on your account will terminate and (i) you will then be charged interest on the balances outstanding on such plans at the applicable regular annual rate from the day after the date of your next statement, and (ii) the balances outstanding will form part of the balance due on that statement.
Any bonus multiplier is based on the rate of collecting CT Money (0.4%) and will be added to whatever the Member would otherwise collect, without the bonus.
Use one hand to hold the stopper at the height you want it. PVC P-traps give you this small amount of wiggle room if you have a metal P-trap, your replacement sink stopper assembly needs to be essentially the exact same length as the old one in order to avoid P-trap adjustments. Make sure you've removed any old putty from the sink with wet rags and a plastic putty knife first. I do not know why it is named that, but it alwayscontains water in the low bend of the trap. Did you make this project? Something will always be as it should not be.
For residents of Quebec, the period between the statement date and the due date for payment is 26 days. The problem is with my pop-up mechanism.
Pull up on the lift rod knob as if you were using the sink.
But, I really don't want to let it beat me like that though. Shipping fees and delivery times vary depending on location, size and weight of the item(s) and is only available within the province of the Canadian Tire retail location (Store) from which the item(s) was purchased. I want to buy a pop up vanity drain stopper, that doesn't need to much work to remove it to put it back every time when I need to cleaning. Following the process described in this article helped me remove the old sink stopper drain and replace it with the new one.
Financing available is Equal payments, no interest for 24 months (unless otherwise stated) and is only available on request, on approved credit and on purchases of $150 (unless otherwise stated) or more (Gift Cards excluded) made with your Triangle credit card at Canadian Tire, Sport Chek, Marks, Lquipeur, Atmosphere, Sports Rousseau, Hockey Experts, LEntrept du Hockey and participating Sports Experts.
Personally, I would find a store with adequate plumbing supplies in stock and match the old stopper. I am enjoying posting things I have learned and done since I got my first to. I trimmed it with a sharp knife and thenthe finished flangefit the hole justfine. including bikes, BBQs, pools, trampolines, outdoor furniture, and more. I currently have no stopper in the sink because the stopper wouldn't stay open. Flat Rubber Suction Sink and Tub Stopper, EasyPOPUP Pop-Up Drain, Easy Install/Remove Stopper, Chrome ABS Body w/Overflow, 1.6-2" Sink Hole, Chrome, No Installation Clog Preventing Bathroom Sink Stopper Chrome Plastic Cap, EasyPOPUP Pop-Up Drain, Easy Install/Remove Stopper, Brass Body w/Overflow, 1.6-2" Sink Hole, Brushed Nickel, SinkSTRAIN Pop-Up Drain, Easy Remove Hair Catcher Stopper, Chrome ABS Body w/Overflow, 1.6-2" Sink Hole, Chrome, EasyPOPUP Pop-Up Drain, Easy Install/Remove Stopper, Brass Body w/o Overflow, 1.6-2" Sink Hole, Brushed Nickel, FlexPOPUP Pop-Up Drain, Easy Install/Remove Stopper, Flex-n-Fit Body w/ Overflow, 1.6-2" Sink Hole, Chrome, Dispenser Location-In Door Standard Depth Refrigerators, Whirlpool 1.1 cu.
To collect bonus CT Money you must present a Triangle Rewards card/key fob, or use any approved Cardless method, at time of purchase or pay with a Triangle credit card.
I added some sealant at the top end of the threaded portion, too.
experience.
If so, smear the pipe joint compound on the exposed tailpipe threads instead. This article walked me through the process with simple, clear, descriptive steps and illustrations that are very accurate.
As I remember, a replacement unit is not very expensive. Pinch the ends of the "C"-shaped retainer clip together and slide off the end of the linkage rod.
on Step 8, I pulled out the plastic ring thats molded to the sink because it was filthy and pulling away from the side.
Any suggestions? I cant find a replacement. Offer subject to change without notice.
Additional conditions and restrictions apply.
Discard it. I hope the experience gives you more confidence to attempt even more things.
The odds of winning a prize depends upon the number of eligible entries received for the applicable draw.
Reply
Test the stopper and check beneath the sink to make sure there arent any leaks. Products shown as available are normally stocked but inventory levels cannot be guaranteed, For screen reader problems with this website, please call 1-800-430-3376 or text 38698 (standard carrier rates apply to texts), 5 in.
I have tightened the retaining nut underneath the sink snugly, tried that, it still leaked.
Not all items sold at Canadian Tire are eligible to earn CT Money or to be redeemed for.
Plus it probably helped the flange and body fit snuggly.
Do not use more than necessary.
Then, go beneath the sink to reconnect the angled pivot rod to the extension bar, and tighten all of the nuts.
If you need help visualizing the proper alignment, drop the lift handle down through the opening in the faucet fixture.
If necessary, you can also temporarily attach the extension bar with the screw that connects them at the clevis.
The lever that you pull up to have the stopper close came off in my hand.
No rainchecks.
The size of those things is standard. It's called a P-trap because the pipes are shaped like the letter P. As opposed to an S-trap, which are often illegal because they tend to siphon dry. Getting everything connected is super annoying, and I'm reluctant to pull out the stopper because I don't want to deal with trying to get it connected again. The minimum payment is the sum of (a) the greater of: (i) interest and fees shown on your statement + $10; or (ii) 5% of the New Balance, excluding amounts on special payment plans, (b) any balance over your credit limit, (c) any amounts past due not included in (b) above, and (d) the amount of any equal payments plan instalments then due.
For tips about how to undo the tailpipe, keep reading! So,,, HELP!!! Once it's adjusted, use the other hand to set the clip, then screw the tailpiece nut back on to the pop-up assembly. That is why there is also one on a toilet .
Contest commences July 1, 2022 at 12:01 a.m. Eastern Daylight Time (EDT) and ends on July 31, 2022 at 11:59 p.m. EDT.
There are instructions on the pop-up assembly package, but I learned some things I wish I had known at the beginning. Go to your local plumbing store to look and ask questions.
 The old pop-up assembly is metal and has a brass retaining nut under the sink.
When I pull the rod to close the drain, it closes tightly and is still obviously connected to the rod. "Bell washer" sink drains have a bell-shaped housing that covers the drain's underside and holds it in place with a nut at the bottom.

Now the problem is baffling to me, and I wonder if you have any ideas. In reality parts have either broken or badly deteriorated from rust and will need to be replaced. Pricing, selection, and availability of store clearance items are determined by each store.
The billing period covered by each statement can be from 28-33 days. The photo shows a typical array of tools and supplies that may be needed to replace a stopper. x 72 in.
Be careful that the body of the pop-up assembly does not rotateout of itsposition. The pop-up stopper is connected to the rod in side the drain.
Check to be sure there is enough sealant and no gaps or air pockets.
/TMUnless otherwise noted, all trademarks are owned by Canadian Tire Corporation, Limited and are used under licence.
Add more sealant if needed.
You have saved my sanity this morning! Feel to make certain it is still in place.
Once the pop-up assembly nut is loose a few turns, rock the pop-up assembly back and forth to loosen the old sealant below the finished flange at the bottom of the sink.
If not, slide the springy "C" clip toward the body of the pop-up assembly until it does pull down and seal.
That makes a seal to keep sewer vapors from coming into the house. Visithttps://www.canadiantire.ca/en/customer-service/ship-to-home.htmlfor more information.
Place a bucket or towels beneath the pipes to catch dripping water.
Question
Hold it firmly while tightening.
I think you could install what you have and have a big catch pan below to test if and where it leaks.
Then, undo the clamp that connects the bar to the angled rod that enters the drainpipe by pinching and separating it.
In some ways, the plastic pop-up assemblykit is an advantage over the metal.
Once it does, you will have difficulty making the nut hold the ball on the linkage rod so there are no leaks. It looked as though it was a barrier to keep the water away from the porcelain.
It is tempting to think something merely separated from another part and you can restore the function of the stopper by manipulating the operating rod while holding the stopper in place or twisting it somehow. The parts on this P-trap are plastic and I really did not need the slip joint plier to loosen them.
So proud.
Your first instinct may be to call a plumber, but you can save some money and earn some satisfaction by replacing the sink stopper yourself. TriangleTM credit cards are issued by Canadian Tire Bank.
x 3 in.
See the photo. You must also have been registered as a member for a minimum of 24 hours before an entry can be received, have an email on file, not opted-out of marketing and have reached the age of majority in your province/territory of residence at time of entry.
Whether you want to replace just the stopper mechanism or the entire drain and stopper system, you should feel confident that it is a job most DIYers can handle without much fuss. Tighten appropriately.
If you have a bell washer strainer, slide the bell housing over the sink drain and wrench-tighten the nut that fits onto the exposed sink drain threads at the bottom.
Visithttps://triangle.canadiantire.ca/en.htmlfor more information. The old finished flange will not be needed. Your comment made my day.
Contest sponsored by Canadian Tire Corporation, Limited. It worked great, until a few weeks ago.
I chose to replace the whole pop-up assembly.
 Cap Dia EasyPOPUP Universal, Easy Install/Remove Pop-Up Stopper in Chrome, 5 in.
  The cost is very little more and I am beginning with all new parts.
If so, take the opportunity to check for (and remove) clogs inside the trap.
x 5-1/4 in. Screw the linkage retainernut onto its place on the body of the pop-up assembly.
We reserve the right to limit quantities. 
Those assemblies are each a bit different depending on who made them. You can make use this same mechanism later if you need to adjust your sink stopper: Look under the sink for a U-shaped clip with a bar that goes inside of the tailpiece.
CT Money is collected on the pre-tax.
The instructions on the package I bought for this project say to shut off the water supply to the sink.
Local store prices may vary from those displayed. It is always nice when you can keep the repairman out of your house.
Hold the body of the pop-up assembly so the fitting for the linkage points toward the rear of the sink, that is, the side toward the wall.
Insert the body into the hole in the sink from below the sink.
If so, you can skip ahead to the steps detailing the installation of a new tailpipe, reconnection of the P-trap, and installation of the drain stopper mechanism. There are four holes among the threads.  Black Aluminum Railing Line Post and Hardware. You can buy kits that include the stopper and the arm with a nylon ball on it. Plastic Kwik Clips (6-Pack) GKK, HOFT Line Post Kit 44 in. I like to clean the vanity drain stopper, since gets dirty, and accumulating hair, I decided to pull it off to wash it, something happens because right now I've the problem that it's too hard to grabe it to take off, so I use a pin, so I decided to put around a piece of elastic thread, in order to pull it off, every time when I need to clean and disinfect it. We use cookies to make wikiHow great.
Was price reflects the last national regular price this product was sold for.
I got everything apart just fine, but when it came to putting the stopper back in so it would actually function properly, I couldn't figure out where I was going wrong to save my life! x 8 ft. Versa-Lam Column, Gardner Bender 3/8 in. You cannot collect paper Canadian Tire Money on bonus offers.
All Rights Reserved.
ft. Built-In Microwave in Stainless Steel WMT50011KS, Lighted 35 Inches Medicine Cabinets with Mirrors, White Makeup Vanity Stool Makeup Vanities, Halo 8 in.
There is no administration fee charged for entering into a special payments plan. How would I fix that part?  Whenthey do, they are often unsightly and an irritation. Basically, I just tell people not to close the drain, and it stays open all the time. I live in an apartment with a very, very lax maintenance program and could not take the nasty drain any more.


x 10 in.
The old sealant cracks and breaks away easily. 3 years ago.
An adjustable wrench and a screwdriver may be needed, but it happened that I did not use them on this project. This article was co-authored by James Schuelke and by wikiHow staff writer, Christopher M. Osborne, PhD.
Thank you for your comment. 
This article has been viewed 217,169 times. They come with a lift rod and linkage. {"smallUrl":"https:\/\/www.wikihow.com\/images\/thumb\/a\/a7\/Replace-a-Sink-Stopper-Step-1.jpg\/v4-460px-Replace-a-Sink-Stopper-Step-1.jpg","bigUrl":"\/images\/thumb\/a\/a7\/Replace-a-Sink-Stopper-Step-1.jpg\/aid9621969-v4-728px-Replace-a-Sink-Stopper-Step-1.jpg","smallWidth":460,"smallHeight":345,"bigWidth":728,"bigHeight":546,"licensing":"
License: Creative Commons<\/a> License: Creative Commons<\/a> License: Creative Commons<\/a> License: Creative Commons<\/a> License: Creative Commons<\/a> License: Creative Commons<\/a> License: Creative Commons<\/a> License: Creative Commons<\/a> License: Creative Commons<\/a> License: Creative Commons<\/a> License: Creative Commons<\/a> License: Creative Commons<\/a> License: Creative Commons<\/a> License: Creative Commons<\/a> License: Creative Commons<\/a> License: Creative Commons<\/a> License: Creative Commons<\/a> License: Creative Commons<\/a> License: Creative Commons<\/a> License: Creative Commons<\/a> License: Creative Commons<\/a> License: Creative Commons<\/a> License: Creative Commons<\/a> License: Creative Commons<\/a> License: Creative Commons<\/a>
\n<\/p>
\n<\/p><\/div>"}, {"smallUrl":"https:\/\/www.wikihow.com\/images\/thumb\/b\/b8\/Replace-a-Sink-Stopper-Step-2.jpg\/v4-460px-Replace-a-Sink-Stopper-Step-2.jpg","bigUrl":"\/images\/thumb\/b\/b8\/Replace-a-Sink-Stopper-Step-2.jpg\/aid9621969-v4-728px-Replace-a-Sink-Stopper-Step-2.jpg","smallWidth":460,"smallHeight":345,"bigWidth":728,"bigHeight":546,"licensing":"
\n<\/p>
\n<\/p><\/div>"}, {"smallUrl":"https:\/\/www.wikihow.com\/images\/thumb\/e\/ef\/Replace-a-Sink-Stopper-Step-3.jpg\/v4-460px-Replace-a-Sink-Stopper-Step-3.jpg","bigUrl":"\/images\/thumb\/e\/ef\/Replace-a-Sink-Stopper-Step-3.jpg\/aid9621969-v4-728px-Replace-a-Sink-Stopper-Step-3.jpg","smallWidth":460,"smallHeight":345,"bigWidth":728,"bigHeight":546,"licensing":"
\n<\/p>
\n<\/p><\/div>"}, {"smallUrl":"https:\/\/www.wikihow.com\/images\/thumb\/c\/c0\/Replace-a-Sink-Stopper-Step-4.jpg\/v4-460px-Replace-a-Sink-Stopper-Step-4.jpg","bigUrl":"\/images\/thumb\/c\/c0\/Replace-a-Sink-Stopper-Step-4.jpg\/aid9621969-v4-728px-Replace-a-Sink-Stopper-Step-4.jpg","smallWidth":460,"smallHeight":345,"bigWidth":728,"bigHeight":546,"licensing":"
\n<\/p>
\n<\/p><\/div>"}, {"smallUrl":"https:\/\/www.wikihow.com\/images\/thumb\/2\/25\/Replace-a-Sink-Stopper-Step-5.jpg\/v4-460px-Replace-a-Sink-Stopper-Step-5.jpg","bigUrl":"\/images\/thumb\/2\/25\/Replace-a-Sink-Stopper-Step-5.jpg\/aid9621969-v4-728px-Replace-a-Sink-Stopper-Step-5.jpg","smallWidth":460,"smallHeight":345,"bigWidth":728,"bigHeight":546,"licensing":"
\n<\/p>
\n<\/p><\/div>"}, {"smallUrl":"https:\/\/www.wikihow.com\/images\/thumb\/6\/6a\/Replace-a-Sink-Stopper-Step-6.jpg\/v4-460px-Replace-a-Sink-Stopper-Step-6.jpg","bigUrl":"\/images\/thumb\/6\/6a\/Replace-a-Sink-Stopper-Step-6.jpg\/aid9621969-v4-728px-Replace-a-Sink-Stopper-Step-6.jpg","smallWidth":460,"smallHeight":345,"bigWidth":728,"bigHeight":546,"licensing":"
\n<\/p>
\n<\/p><\/div>"}, {"smallUrl":"https:\/\/www.wikihow.com\/images\/thumb\/c\/cf\/Replace-a-Sink-Stopper-Step-7.jpg\/v4-460px-Replace-a-Sink-Stopper-Step-7.jpg","bigUrl":"\/images\/thumb\/c\/cf\/Replace-a-Sink-Stopper-Step-7.jpg\/aid9621969-v4-728px-Replace-a-Sink-Stopper-Step-7.jpg","smallWidth":460,"smallHeight":345,"bigWidth":728,"bigHeight":546,"licensing":"
\n<\/p>
\n<\/p><\/div>"}, {"smallUrl":"https:\/\/www.wikihow.com\/images\/thumb\/c\/c0\/Replace-a-Sink-Stopper-Step-8.jpg\/v4-460px-Replace-a-Sink-Stopper-Step-8.jpg","bigUrl":"\/images\/thumb\/c\/c0\/Replace-a-Sink-Stopper-Step-8.jpg\/aid9621969-v4-728px-Replace-a-Sink-Stopper-Step-8.jpg","smallWidth":460,"smallHeight":345,"bigWidth":728,"bigHeight":546,"licensing":"
\n<\/p>
\n<\/p><\/div>"}, {"smallUrl":"https:\/\/www.wikihow.com\/images\/thumb\/e\/ee\/Replace-a-Sink-Stopper-Step-9.jpg\/v4-460px-Replace-a-Sink-Stopper-Step-9.jpg","bigUrl":"\/images\/thumb\/e\/ee\/Replace-a-Sink-Stopper-Step-9.jpg\/aid9621969-v4-728px-Replace-a-Sink-Stopper-Step-9.jpg","smallWidth":460,"smallHeight":345,"bigWidth":728,"bigHeight":546,"licensing":"
\n<\/p>
\n<\/p><\/div>"}, {"smallUrl":"https:\/\/www.wikihow.com\/images\/thumb\/6\/60\/Replace-a-Sink-Stopper-Step-10.jpg\/v4-460px-Replace-a-Sink-Stopper-Step-10.jpg","bigUrl":"\/images\/thumb\/6\/60\/Replace-a-Sink-Stopper-Step-10.jpg\/aid9621969-v4-728px-Replace-a-Sink-Stopper-Step-10.jpg","smallWidth":460,"smallHeight":345,"bigWidth":728,"bigHeight":546,"licensing":"
\n<\/p>
\n<\/p><\/div>"}, {"smallUrl":"https:\/\/www.wikihow.com\/images\/thumb\/4\/4d\/Replace-a-Sink-Stopper-Step-11.jpg\/v4-460px-Replace-a-Sink-Stopper-Step-11.jpg","bigUrl":"\/images\/thumb\/4\/4d\/Replace-a-Sink-Stopper-Step-11.jpg\/aid9621969-v4-728px-Replace-a-Sink-Stopper-Step-11.jpg","smallWidth":460,"smallHeight":345,"bigWidth":728,"bigHeight":546,"licensing":"
\n<\/p>
\n<\/p><\/div>"}, {"smallUrl":"https:\/\/www.wikihow.com\/images\/thumb\/c\/cd\/Replace-a-Sink-Stopper-Step-12.jpg\/v4-460px-Replace-a-Sink-Stopper-Step-12.jpg","bigUrl":"\/images\/thumb\/c\/cd\/Replace-a-Sink-Stopper-Step-12.jpg\/aid9621969-v4-728px-Replace-a-Sink-Stopper-Step-12.jpg","smallWidth":460,"smallHeight":345,"bigWidth":728,"bigHeight":546,"licensing":"
\n<\/p>
\n<\/p><\/div>"}, {"smallUrl":"https:\/\/www.wikihow.com\/images\/thumb\/7\/7e\/Replace-a-Sink-Stopper-Step-13.jpg\/v4-460px-Replace-a-Sink-Stopper-Step-13.jpg","bigUrl":"\/images\/thumb\/7\/7e\/Replace-a-Sink-Stopper-Step-13.jpg\/aid9621969-v4-728px-Replace-a-Sink-Stopper-Step-13.jpg","smallWidth":460,"smallHeight":345,"bigWidth":728,"bigHeight":546,"licensing":"
\n<\/p>
\n<\/p><\/div>"}, {"smallUrl":"https:\/\/www.wikihow.com\/images\/thumb\/5\/52\/Replace-a-Sink-Stopper-Step-14.jpg\/v4-460px-Replace-a-Sink-Stopper-Step-14.jpg","bigUrl":"\/images\/thumb\/5\/52\/Replace-a-Sink-Stopper-Step-14.jpg\/aid9621969-v4-728px-Replace-a-Sink-Stopper-Step-14.jpg","smallWidth":460,"smallHeight":345,"bigWidth":728,"bigHeight":546,"licensing":"
\n<\/p>
\n<\/p><\/div>"}, {"smallUrl":"https:\/\/www.wikihow.com\/images\/thumb\/d\/d9\/Replace-a-Sink-Stopper-Step-15.jpg\/v4-460px-Replace-a-Sink-Stopper-Step-15.jpg","bigUrl":"\/images\/thumb\/d\/d9\/Replace-a-Sink-Stopper-Step-15.jpg\/aid9621969-v4-728px-Replace-a-Sink-Stopper-Step-15.jpg","smallWidth":460,"smallHeight":345,"bigWidth":728,"bigHeight":546,"licensing":"
\n<\/p>
\n<\/p><\/div>"}, {"smallUrl":"https:\/\/www.wikihow.com\/images\/thumb\/1\/10\/Replace-a-Sink-Stopper-Step-16.jpg\/v4-460px-Replace-a-Sink-Stopper-Step-16.jpg","bigUrl":"\/images\/thumb\/1\/10\/Replace-a-Sink-Stopper-Step-16.jpg\/aid9621969-v4-728px-Replace-a-Sink-Stopper-Step-16.jpg","smallWidth":460,"smallHeight":345,"bigWidth":728,"bigHeight":546,"licensing":"
\n<\/p>
\n<\/p><\/div>"}, {"smallUrl":"https:\/\/www.wikihow.com\/images\/thumb\/e\/ec\/Replace-a-Sink-Stopper-Step-17.jpg\/v4-460px-Replace-a-Sink-Stopper-Step-17.jpg","bigUrl":"\/images\/thumb\/e\/ec\/Replace-a-Sink-Stopper-Step-17.jpg\/aid9621969-v4-728px-Replace-a-Sink-Stopper-Step-17.jpg","smallWidth":460,"smallHeight":345,"bigWidth":728,"bigHeight":546,"licensing":"
\n<\/p>
\n<\/p><\/div>"}, {"smallUrl":"https:\/\/www.wikihow.com\/images\/thumb\/a\/ad\/Replace-a-Sink-Stopper-Step-18.jpg\/v4-460px-Replace-a-Sink-Stopper-Step-18.jpg","bigUrl":"\/images\/thumb\/a\/ad\/Replace-a-Sink-Stopper-Step-18.jpg\/aid9621969-v4-728px-Replace-a-Sink-Stopper-Step-18.jpg","smallWidth":460,"smallHeight":345,"bigWidth":728,"bigHeight":546,"licensing":"
\n<\/p>
\n<\/p><\/div>"}, {"smallUrl":"https:\/\/www.wikihow.com\/images\/thumb\/6\/6b\/Replace-a-Sink-Stopper-Step-19.jpg\/v4-460px-Replace-a-Sink-Stopper-Step-19.jpg","bigUrl":"\/images\/thumb\/6\/6b\/Replace-a-Sink-Stopper-Step-19.jpg\/aid9621969-v4-728px-Replace-a-Sink-Stopper-Step-19.jpg","smallWidth":460,"smallHeight":345,"bigWidth":728,"bigHeight":546,"licensing":"
\n<\/p>
\n<\/p><\/div>"}, {"smallUrl":"https:\/\/www.wikihow.com\/images\/thumb\/3\/33\/Replace-a-Sink-Stopper-Step-20.jpg\/v4-460px-Replace-a-Sink-Stopper-Step-20.jpg","bigUrl":"\/images\/thumb\/3\/33\/Replace-a-Sink-Stopper-Step-20.jpg\/aid9621969-v4-728px-Replace-a-Sink-Stopper-Step-20.jpg","smallWidth":460,"smallHeight":345,"bigWidth":728,"bigHeight":546,"licensing":"
\n<\/p>
\n<\/p><\/div>"}, {"smallUrl":"https:\/\/www.wikihow.com\/images\/thumb\/f\/f5\/Replace-a-Sink-Stopper-Step-21.jpg\/v4-460px-Replace-a-Sink-Stopper-Step-21.jpg","bigUrl":"\/images\/thumb\/f\/f5\/Replace-a-Sink-Stopper-Step-21.jpg\/aid9621969-v4-728px-Replace-a-Sink-Stopper-Step-21.jpg","smallWidth":460,"smallHeight":345,"bigWidth":728,"bigHeight":546,"licensing":"
\n<\/p>
\n<\/p><\/div>"}, {"smallUrl":"https:\/\/www.wikihow.com\/images\/thumb\/c\/ca\/Replace-a-Sink-Stopper-Step-22.jpg\/v4-460px-Replace-a-Sink-Stopper-Step-22.jpg","bigUrl":"\/images\/thumb\/c\/ca\/Replace-a-Sink-Stopper-Step-22.jpg\/aid9621969-v4-728px-Replace-a-Sink-Stopper-Step-22.jpg","smallWidth":460,"smallHeight":345,"bigWidth":728,"bigHeight":546,"licensing":"
\n<\/p>
\n<\/p><\/div>"}, {"smallUrl":"https:\/\/www.wikihow.com\/images\/thumb\/c\/ca\/Replace-a-Sink-Stopper-Step-23.jpg\/v4-460px-Replace-a-Sink-Stopper-Step-23.jpg","bigUrl":"\/images\/thumb\/c\/ca\/Replace-a-Sink-Stopper-Step-23.jpg\/aid9621969-v4-728px-Replace-a-Sink-Stopper-Step-23.jpg","smallWidth":460,"smallHeight":345,"bigWidth":728,"bigHeight":546,"licensing":"
\n<\/p>
\n<\/p><\/div>"}, {"smallUrl":"https:\/\/www.wikihow.com\/images\/thumb\/e\/e4\/Replace-a-Sink-Stopper-Step-24.jpg\/v4-460px-Replace-a-Sink-Stopper-Step-24.jpg","bigUrl":"\/images\/thumb\/e\/e4\/Replace-a-Sink-Stopper-Step-24.jpg\/aid9621969-v4-728px-Replace-a-Sink-Stopper-Step-24.jpg","smallWidth":460,"smallHeight":345,"bigWidth":728,"bigHeight":546,"licensing":"
\n<\/p>
\n<\/p><\/div>"}, {"smallUrl":"https:\/\/www.wikihow.com\/images\/thumb\/4\/45\/Replace-a-Sink-Stopper-Step-25.jpg\/v4-460px-Replace-a-Sink-Stopper-Step-25.jpg","bigUrl":"\/images\/thumb\/4\/45\/Replace-a-Sink-Stopper-Step-25.jpg\/aid9621969-v4-728px-Replace-a-Sink-Stopper-Step-25.jpg","smallWidth":460,"smallHeight":345,"bigWidth":728,"bigHeight":546,"licensing":"
\n<\/p>
\n<\/p><\/div>"}, How to Install a Bathroom Sink: A Complete Guide.
Sitemap 11
