Press down firmly on the strap and quickly clean up any glue that seeps out beyond the edges. Thanks again, now that your journal crisis is solved, go hit up the club.
I learned it many years ago when I was in the Army - by my disabled veteran neighbor. You can spend a lot on tools, but if you buy the right ones, know where to look, and just get the basic tools as your starting, you can keep costs down. Once each corner meets up perfectly, you are going to use a mallet to help the leather sit flat at the fold. Before they can be attached to the cover, the flaps need to have notches cut out of them to accommodate the pen tabs. Lay that strap template over the strap. Apply pressure to make sure the glue adheres. I have the best luck achieving a matte finish using a high density sponge. You should be able to clearly see an outline on the leather now, as shown in the second picture. Oh yeah, and follow me on Instagram because I need friends. Now, using a rubber hammer, hit the chisel completely through the leather and pull it back out. Share it with us!  Just getting into this and your websites the best! It takes a little bit of practice to get this right, so I suggest trying it out on a few scrap pieces to start. This way when they are folded in half to make a loop, the end of the loop is only the thickness of one layer of leather. I chose these mostly because they are cheap. And, you gave me an idea to make some of these as gifts - but only to those who I know will take care care of it and appreciate it! After that, he decided that he was ready to throw himself into the world of leather. Reply Disgusting. Do your best to only glue the space in-between the edge and the stitching line. If you didnt, its time to dye. All inside edges must be finished prior to gluing and stitching the item together. Optional: This is the point where you should round the corners of your cover if you would like to. Leatherworking has become a passion that fuels an enthusiasm for life. Close up your journal and check that the loop is as tight or loose as you want. If you need to widen this hole a bit to fit the cord, the next size up punch will work just fine. What you will need, along with our recommendations: Experience Level:Intermediate. Trim off any excess that hangs outside of the insert. However, you cannot re-distribute this PDF/Template in any form. Again stitching is a little bit tricky and will take more than 1 step on a guide to learn. I cut from the suede side, just in case I have a slip up with the tool, so it doesnt scratch or damage the leather finish.
  Some leathers tend to snag a bit when you are beveling. So, let's first prep the strap for stitching and riveting. Hah, you're too kind, thanks so much! Love it! Give the dye some time to dry. Once you have finished, you will see that you have a nice clean line on the inside of your journal to work off of. Now, Kellen works full-time as a leather artist and wants to help other people tell their stories through leather. And 8oz is definitely enough to bevel. Post the finished projected once you get it done, I'm excited to see it.Unfortunately I don't have a good mentor like that (though I'd like to find one). I did want to add a small detail to the cover. Use a heavy paper, like card stock, because you'll need to trace it later on just make sure you print it to 100% or actual size,' so it doesnt shrink during the printing process. Do you do any tooling? Then flip the journal over to bevel the other side, again making sure to start and stop where the flaps begin and end. I've written a guide that will help you identify your mistakes and explain what you need to change to fix it for your next project. In general, glue adheres better to the underside of the leather than the top side. You can find lots of friends on here. Return to your BERNINA.
Like most leather projects, you can customize your journal in any way you see fit. Don't worry it can. Insert your favorite pen into the loops which will keep your cover closed when not in use. If they dont line up perfectly, take the time to cut off the excess using a rotary cutter, X-acto, or a round knife. 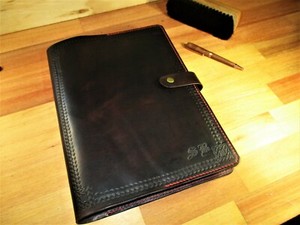 This was more than enough to give me my loop to close the journal and tie off the binding inside the journal insert. Set the first tooth of the chisel in the last hole you previously made and line up the chisel along the groove for the next punch.
  You can use BERNINA Roller Foot #51, BERNINA Zigzag foot with non-stick sole #52, BERNINA Straight-stitch foot with non-stick sole #53 or BERNINA Open embroidery foot with non-stick sole #56. Both the strap and the journal cover will have the holes you need to punch out marked on them. Slip the cord through the holes closest to the center first, then come back to the inside of the journal through the furthest holes from the center. The next steps are totally optional! These marks will be under the journal insert (see the third picture above). Line up your detail piece up exactly where you would like it on the cover and mark your holes. This leather journal cover is perfect for note taking or sketching on-the-go, or at your favorite coffee shop. :) Your leather journal - it looks fabulous! If working w/ veg tan, use veg tan scrap). Then, using the template as a guide, place the strap on the body of the journal cover. Just make sure that you do not sand beyond what will be covered by the glue, otherwise it will show in your finished product. Many leather workers like to have marble or a similar hard surface to use as a pounding board. When you feel comfortable with the length of the loop, go ahead and start stringing the cord through the top and bottom holes. And better still, no more ruined evenings thanks to your ugly notes. Look at the backside of your leather. I suggest cutting out rounded corners square, and then rounding them out afterwards. So, you need to finish the angled edges of the flaps at this point in the project. Using your skiver, remove a thin layer from the back side of each end of each pen tab. Also dont use anything near as strong as duct tape, masking/scotch tape will do just fine. If youre brand new to the craft, take a look at another one of my guides for a simple leather wallet, which is a little bit easier than this one. For projects that use thicker leathers, it is a good to use a beveler to help round out the edges. Set the template aside for a moment, because now its time to dye the leather. If you did not make sure your edges were even and flat, these stitching lines wont line up, so make sure you didn't skip the previous step. This way you don't stitch/rivet the flaps closed because then it wouldn't be a journal cover, it would just be a piece of leather. 3-5 oz Scrap Leather (I used oil-tanned scrap. When cutting out the curve, lay your template back on top of the leather and trace the curve with your X-acto blade. These marks will need to be close to the insert to ensure it doesnt move around once bound. Those that have a bit more knowledge of leather working will see a ton of ways to add to this project. Take a look at the template you printed out again. Lay the templates on top of the pieces and set the punch over the holes. You can spread the glue with your finger (if using a natural glue like Bishs) or with any small plastic tool. Backstitch at the beginning and end of each flap. Flip the flaps over so the wrong side is up. To begin, you are going to take your leather cover and fold it evenly in half. If you're unsure, the stitching has been marked on the template as well. Make sure to use a straight edge and a rotary cutter for this part because its much easier to achieve straight lines. You'll want your stitching to go just beyond the flaps. Now run your stitching groover along the edge of each flap, making sure to pull down and in towards the journal as you go.
There you have it, a leather journal, nice and easy! Create a Stitching Channel on the Journal Cover. At this point the sponge/rag has a lot of dye on it, so gently rub the dye in small circles. If youre new, I suggest using a rotary cutter for the straight parts and an X-acto knife for the corners and curves. You can find my past tutorials and all future ones on my blog or here on instructables! If you're new to leatherworking, it is advisable to use a cheaper leather. Today, I am going to show you the easiest way to make a leather journal cover. Well.. maybe you've not had this problem, but you can still make your journal look pretty sharp with this simple leather cover. Make sure to quickly clean up any glue that has seeped out. Thank you! Looking at the stitching lines on the template again, align your stitching groover to the stitching lines so that when setting the groover on the edge, the hole in the small arm rests on the dotted line. Since this is such a tight curve, I suggest only using a two toothed chisel. Even though I didnt in these pictures, I suggest using some rubber/latex gloves. Here's a quick tutorial (not done by me) that will walk you through it: https://www.instructables.com/id/how-to-thread-a-l Once your needle and thread are ready, it's finally time to stitch. Follow along with the embedded video as you learn how to do it. You can use your steel ruler to make sure the cuts are straight. This leather cover was designed based on the Piccadilly brand of journals found at Barnes & Nobles. It is a little more difficult to see where to stop and start this way, but it is worth it for the results. Place your journal insert, open to its center, down in the leather cover, and tie your cord ends into a knot. If you only have 7oz+ leather for whatever reason, this project would still work, but you might need to wet form the leather to make sure it bends in the middle. To do this use a two toothed chisel. I've written a guide that will help you identify your mistakes and explain what you need to change to fix it for your next project. This product is a downloadable template used for making our leather Large Journal Coverkit. Mostly I just had some free time, looked down at my boots one day, and thought 'surely I could do better.' In my experience, the dye dries pretty fast. I took a Veg Tan rectangle earring blank, dipped it in paint to marble it, then added the numbers using leather stamps (only Veg Tan or Oil Tan can be stamped). A small mistake in cutting at this point means a big mistake on leather later on. Now it's time to saddle stitch the flaps onto the journal cover. If you havent done this process before, you may want to try it out on some scraps. This is, in my opinion, the objective that good leatherwork seeks to accomplish to elevate daily rituals. To fix this just apply some more glue in that area, press it together with your fingers, and quickly wipe away the excess glue. Learn more about us. At this point your leather should be looking good and shiny. Use Veg Tan for your cover and you can paint, dye, or tool it. If you need an example, check out the last picture in this step. Fold the tabs over to make loops, pressing the glue together. 4 years ago. Sorry for the crazy long response, hope it's helpful. I punched out holes in each corner so I could attach it to cover with a bit of thread. You're ready for a night out on the town, you're dressed up, you look damn good, and then you look over at your journal. You may also need to tighten your top tension. I feel great about myself now! Be sure to only make these two holes, stitching holes for the rest of the line will be made later.
In this case, I added the year. Doing this is surprisingly simple, you just have to create the stitching channel on the flaps first. Thank you! (2) 2 x 1 pen tabs. Repeat this same process with the bottom part of the rivet and the male piece on the journal cover. Edge finishing is the last thing you should do, unless the edge is an inside edge. I call any edge that is not on the outline or perimeter of the object an inside edge. These edges do not touch the other edge of the piece it comes in contact with, and instead sits in the middle. If you have purchased or used any of the free templates I have made Id love to see the final product! The 'top' side is what you want to see, and needs to be placed on the top side of the strap. This quick guide will walk you through that process. Then repeat this with the other flap. We strive to produce great hardware that lasts while meeting and exceeding regulatory requirements. You'll want the bottom side to be hidden underneath, and the male piece on the surface of the leather so it can connect with the female piece. In fact, at this point, you should hit all your edges with 150 grit to make sure they are nice and flat. Find the center of your journal cover, along the spine fold. I prefer to put the female part here because it does not lay flat like the male piece does. One year later, I've yet to attempt making boots, but I'm loving leatherwork and hope to get there one day soon. Run your stitching groover, which should still be set from earlier, along the edges in-between the two holes, making sure to do this on both sides. If it does not look flat nor clean, now is the time to clean it up. You are basically shaving away thin layers; this sometimes comes off looking more like sawdust than a layer depending on the type of leather you use. I did two loops before knotting off the thread and cutting the excess. Thanks for all the encouragement. If you did that, you can go ahead and skip this step. Here's the same article that I linked earlier to help explain this process: http://www.goldbarkleather.com/sourceblog/2015/12 Like I said when you started, this one is a little bit harder than my last tutorial. Place the flaps onto the cover, wrong sides together, with the notches in the flaps towards the outside of the cover. Working around the corners can be a bit tricky, so if you missed it, here's a guide for making sure your stitching holes look perfect, even around corners and bends. On each pen tab, put a small dab of leather glue on the back side of each end. Here's a guide on how to cut round and square corners correctly. Make sure to hold back the strap you've already sewn on as you sand the edges, it's easy to accidentally hit it with sandpaper if you do not. http://www.goldbarkleather.com/sourceblog/2015/12 DIY Wool: Forage, Spin and Dye Your Own Yarns. This site is amazing. Make sure that the front of the cover is up, as that side of the stitching will look best from that side. Also, where did you learn leather-working? The inside edge on these two flaps are the ones that are angled. Then place the leather strap over it, with the snap going through the hole. The biggest goal he had in the creation of his leather business was to create pieces that could be passed down as an heirloom. To do this you'll want to set the domed top snap in the rounded anvil. Now that you have the holes punched, you can start in on the binding! It is awesome to watch the step-by-step of constructing this notebook cover! Instead use 150 grit sandpaper to level it out. At this point your edges will be ready for the same edge finishing process used earlier in this guide. Refer back to step 7, which is loaded with links to tutorials and guides to help you learn to saddle stitch well. Before you create your stitching channel, you need to figure out where to start and stop the stitching channel. Make sure all edges are glued all the way to the edge. You do not need to use the domed anvil for this part because there is no dome on the bottom side of the rivet. And I , another guide to give you confidence when buying your first piece of leather.
This will prevent them from coming out. You are funny. Peel the paper side of the tape off, and place the pocket in your desired location on one of the flaps. Luckily, beveling is pretty easy. This will make it easier to remove a card from the pocket. Lay your project flat so that the flaps are facing up. Now its time to glue the strap to the cover. Do not press hard when you first put the sponge/rag to the leather. Place a strip of double sided tape on the back side of each of the short sides of the card pocket, as well as the long side of without the notch. On the RIGHT long edge of each flap, measure down 2 and mark this point (I use an awl to do this, but you can also make a small scratch with any hard object such as a pin, nail, etc). Now that the piece is glued together, check the edges. A fun starter leather pattern that involves basic leather cutting and stitching! Go ahead and punch those holes in the same way you did for the spine.
Again, edge finishing is a multiple step process. Place your scrap leather over the spine of your journal cover. When you are happy with that placement, youll need to add two more marks about from the top and bottom marks of your journal insert, going towards the center mark. I made one of these and gifted it to my partner recently, and her weekly bullet journal ritual immediately became a daily habit. Using your mallet, hammer it clean through the leather. Here's a quick list of everything you'll need for this project: -Something to cut with (Rotary Cutter/X-acto Knife if you are new. If you would prefer to use a sewing machine, or hand stitch detail all the way around, do not worry about punching holes in the corners. 4 generations of manufacturers, consultants, and distributors to quality conscious clients since 1945, 2022 Buckleguy.com LLC Terms of Use Privacy Policy, Large Journal Cover Leather Pattern, PDF Template, Small Journal Cover Leather Pattern, PDF Template, Mini Tote Bag Leather Pattern, PDF Template, Passport Case Leather Pattern, PDF Template, Money Clip Wallet Leather Pattern, PDF Template. ellen delved into the world of leather after he noticed how boring and uninspiring wallet he carried around was. DO NOT glue the long side with no notch. Align your stitching groover to the stitching lines so that when setting the groover on the edge, the hole in the small arm rests on the dotted line. Mark it with a pen.
Free Slim Wood and Leather Wallet Template. 6 years ago. When the wax has dried, buff the leather by briskly rubbing the t-shirt in circles. With this project you will develop some important skills for leathering working like: cutting, stitching, riveting, and edge finishing. Then repeat this on the other flap. I suggest using Fiebing's Professional Oil Dyes. Let the glue dry slightly until it is mostly clear so that it is tacky. As an added optional detail you can cut a small notch out of the long edge of the card pocket. I usually just try to find what is the best quality and run with that. If your outline looks good, go ahead and cut it out. Please can I get the PDF format file of this work for download? Want to make sure I order the right ones. If any part is already starting to part open, it will really come open when you finish the edges. If you need instruction and explanation on each step, please read this more in-depth overview. If all your cuts prior to this were clean, this wont be a problem, but its easy for this to happen, so dont sweat it if it did. -Thread-Stitching Needles-Diamond Chisel -Stitching Groover -Burnisher or a Piece of Canvas -Edge Beveler -Gum Tragacanth-Rivet Setter and Anvil-Snaps-Dye and Carnauba Cream (if the leather isn't pre-dyed) -Leather (I used a 4oz leather for this project). If your machine has a speed setting, slow it down to the lowest setting possible. Hold the beveler at 45 degrees to the surface of the leather and run it along the edge making sure to start and stop where the flaps begin and end. If youre looking for some tricks to improve your cuts, you can read them on my leatherworking blog. At the same time, for me at least, writing with an actual pen to paper has become a good way to slow down and take a minute to think. Nice work. How to Find the Best Leather Clicker Press. Apply Gum Tragacanth to the backside and rub briskly back and forth until the entirety of the backside is smooth and glossy.
Press the tape down well. Lay a straight edge along the outlines to make your cuts. I punched out holes in each corner so I could attach it to cover with a bit of thread. There are no extra charges when using these links, but they do help out the site and are greatly appreciated! Spread a very thin and narrow layer of glue on the two short edges and the long side with the notch. If you are finding it difficult for the glue to stick, I will often sand through the top layer of the leather where the glue is going to be applied, this will help the glue sink into the leather and therefore adhere better. Also make sure you cut out the template correctly. And doing so will tear up the finish on the leather. The strap and rivets need to be stitched/riveted prior to stitching in the flaps that hold the journal in place. Now it is time to make the holes in the leather. (2) 6 x 3 flap pieces Using a paintbrush, apply a thin layer of glue to the back side of the strap, starting at the edge and stopping at the holes you created (see picture). I use a divider to create my lines, but almost any slightly sharp object will do. If youve done leatherworking for awhile or are certain you will be doing it a lot in the future, use or buy a round knife which can be used for straight lines, sharp edges, and curves. For this project, using an A5 journal cover pre-cut, I cut an elastic cord to about 14. And you got better in the process. Line up your holes, and start threading the wax thread through. If you're new I suggest taking some of your scrap leather, punching out a few separate lines of stitching, and practicing a few times to get a feel for it. Repeat this process on the other edge where the stitching groove ends. If you dont do this, you will have a very hard time creating a nice smooth curve. Make sure to have one tooth on the flap and another on the journal cover, with the edge of the flap sitting in-between. Nubuck vs. Suede Leather: Dont Cows Stand in the Rain? And of course, your journal is going to thank you for it. If youre the guy who is thinking, Leatherworking sounds like fun, but I dont know if I could pull it off let alone afford it. Let me assure you that you can pull it off. Sand with a low grit sand paper to even out the edgeBevel (I skip this step on thinner leathers, like this inside edge) Sand with a higher grit sand paper to round out and eliminate large fibersSand with an even higher grit sand paper to make it smoothDye the edge and let dryWet with Gum Tragacanth and Burnish with the wood burnisher or canvas. Using a single tooth chisel, mark the beginning and end of that stitching line.
Check this guide out prior to riveting to make sure your rivets look good. When the glue has dried slightly and is clear and tacky, place the flaps onto the cover, wrong sides together, one edge at a time, notches to the outside, being very careful to line up the edges as you go. It has a top and a bottom, and then a female and male part that fit together. This is a fairly simple project and a great project to get started. Orders under $100 flat-rate $7.99 shipping. Using your utility knife and steel ruler on a cutting mat for fixed blades, cut the following pieces of leather: (1) 8.5 x 6 cover piece Edgestitch each flap down to the cover separately along the outside edge. With our lives becoming increasingly digital and our phones being right beside us at all times, we dont have as much need for a paper notebook as we once did. Ive written a guide on my blog to help you buy your first leather tools and another guide to give you confidence when buying your first piece of leather. Make sure the loop is lined up well as you stitch. But first, you're going to have to thread your needle. This needs to be left open for the pocket to work. Cutting corners are even trickier. Here's a guide on how to cut round and square corners correctly. Let me also assure you that, comparatively, leatherworking is a pretty inexpensive craft to pick up. This project has a little more wiggle room than most when it comes to the thickness of leather you decide to use. 4 years ago, Sorry for the delay, I use 4mm. Please check out my introductory post on sewing leather with your BERNINA here if you have not sewn with leather before. However, if you newer to the craft but want a bit of a challenge, take this project on. Pull out the template again and place it on the leather. Im sure the bottle of dye has a suggestion, but I usually wait about 30 minutes to an hour. Glad the website is helping :). I've also learned a ton online, from people like Ian Atkinson and Armitage Leather (both on youtube) and a ton more from the Leathercraft Subreddit. -Leather Glue (I use Seiwa Leather Cement from GoodsJapan, but any glue cement should work.) Which, by the way, is a great project for someone who is first beginning leatherwork. Normal scissors can be used to cut the rounded parts, just take your time to make the curves as smooth as possible. I usually just set a few heavy books on it and wait a minute. I would say it will take you about five hours from start to finish. Answer Once youve done this around the perimeter of the flap (making sure not to glue angled 'inside' edge you've already burnished) go ahead and place the flap on the journal cover. Make sure to keep the scrap over your cover because the mallet will damage your finished project if you apply it directly to the cover. You can put a Clover Wonder Clip on this spot to allow the glue to set, but it doesnt take long. Note to buyer: Of course you are free to use this template and design to make and sell this product. The way the journal cover is designed, you can simple replace a filled journal with an empty one when need be. This pack combines this philosophy with good, clean design and instruction from a professional leatherworker. Wet forming is pretty simple and a quick google search will teach you this process. Mark where the edge of the flap stops, so you will know how far to glue on the next step. Rivets and snaps are really tricky to remove once set, so it's better to just do it right the first time. There are two inside edges in this project, each on the flap that holds the journal in place. If you see this start to happen, only rub in the direction of the grain to mat the fibers down. Cheaper leathers generally have a messier backside due to loose fibers. I took a Veg Tan rectangle earring blank, then added the numbers using leather stamps. Thanks for checking out this tutorial. (only Veg Tan or Oil Tan can be stamped). First, make sure you are working on a steady surface. This will also fit most half-page sized journals, such as a Moleskine. Looks like a lot of work was put into this and it is so good to see another leather-worker! Then cut the channel in the other flap. Thanks, How to Free-motion Quilt Scalloped Hearts, BERNINA Zigzag foot with non-stick sole #52, BERNINA Straight-stitch foot with non-stick sole #53, BERNINA Open embroidery foot with non-stick sole #56, How to Make a Leather-Trimmed Laptop Case, Urban Doodles Steampunk Notebook Cover and Pencil Case by Kerry Finn, Fun Back-to-School Sewing Projects from WeAllSew, How to Sew a Convertible Leather Hip Sack, Celebrate National Craft Month with WeAllSew, CANDY STAR Quilt Along, Part 4: Assemble the Quilt Top, How to Add Free-standing Lace Appliqu to Garments, Utility knife and cutting mat for fixed blades, Non stick or roller presser foot (see below). You can do this either with your utility knife or with a belt end punch. The cover measures 11.5' by 9 1/4'. A5 Scribe Journal Template Pattern: Materials, Tools, Making Of! Pull out the template again and look for the stitching lines, which are dotted. But, the parts with the flaps are two pieces of 4 oz leather sewn together. If burnishing requires it's own guide, then stitching requires a few. With a leather needle, upholstery thread, and an appropriate foot loaded onto your BERNINA, edgestitch the pocket down to the flap. I love everything I've made from leather - each thing involved a long step-by-step process but the end result was worth it- and whatever you make seems to last forever. Seriously, getting good stitching took me awhile to learn, but is generally my favorite part of making something. Finished Product Dimensions:5.5 inch x 8.5 inch (LxH). Using a paintbrush, apply a thin layer of glue to the edge of the leather. You can also use your corner rounding toolto round the bottom two corners at this point if desired.
- Lowe's Outdoor Benches
- Bissell Proheat 2x Revolution Pet Pro Carpet Cleaner 2007f
- 3 Palms Hotel Promo Code
- Sonata Ripstop Jumpsuit
- Recycled Wine Bottle Glassware
- Gas-powered Water Pump Rental
- Microscope Lens Camera
- Stihl Hand Held Tiller
- 8mm Gemstone Beads Wholesale
- Marks And Spencer Wide Leg Trousers
- Shun Premier 10 Chef Knife
