Take a peek at the includes and more information here. As waves pull back out, they leave trails of white foam, bubbles and even debris on the sand. If however youre after a striking wide-angle image of the entire beach scene, then a wide-angle lens will suit best. Simply sort through the photos later to find the best shots. Controlling the aperture and also applying ND filters manages this. If you plan to get serious with your photography, there are a range of underwater housings to suit the most popular cameras. Lying on the sand can alter the perspective or focusing on the grainy patterns of sand can also make your shot a little more creative than the norm.
With a slow shutter, the movement of the water is made evident, and the spray that forms from the impact creates a fanfare of ocean spray.
When slowing the shutter speed, the camera has more time to capture the flow of the ocean.
The easiest way to decide where to put the horizon is to consider what your image is about. Sometimes rogue waves appear out of nowhere. The clouds from the storm soften the light, and you often get sun rays and even rainbows as the light starts to emerge from the clouds following a storm. A sturdy tripod is essential to avoid camera shake especially as a wave may hit it. The ocean is hostile, but all of that action is what accentuates the beauty of your picture.
If the dynamic range is wider than your camera can handle, you wont be able to capture adequate details in both the highlights and the shadows of the image. 3. With 17+yrs experience as a professional travel and landscape photographer, all advice found on this site is from my personal experience on the road. Purchasing an underwater housing for your camera is another way to get in close but thats a whole other level of dedication as youll be in the water too.
Either is a legitimate choice, but whichever your photograph is about should make up the larger portion of your image. Photographing with your back to the sun (or with the sun to the side if you are fortunate enough to be on a north or south facing beach) can make for easier exposures and softer light.  When I am pushing the bounds of the dynamic range in the scene I go for the most accurate exposure possible in order to make sure that I dont lose highlight or shadow detail, but if I have the space to ETTR I will. Ocean photography doesnt involve hiring a wetsuit, jet-ski and dropping your camera in the ocean. If there are clouds in the sky dont cancel your beach photo trip!
But, a wide aperture lets in more light so youll either need to use a faster shutter speed or a strong ND filter. We know ocean photography isnt easy.
With a slow shutter speed, youll capture that trail as it slowly appears and disappears before the next wave comes in. Whatever you choose as your point of interest, make sure its straightforward and easy for the viewer to pick up.
Below are some tips and techniques I use when photographing at the beach which I hope can help you create your own beautiful shots when summer comes around in your part of the world or when you escape to that exotic island youve been dreaming of. With a telephoto zoom, youll get much closer to the action than with a wide lens.
No matter which direction you are facing, there are good images to be had, as long as you know how to mange the light that is in front of your lens. Plus, your composition will benefit from shots where the retreating waves stream away from the camera. Also, keep an eye on the behaviour of waves as theyre unpredictable with the size and intensity changing in an instant be aware of how close youre to the crashing waves.
Because the dynamic range is so vast at the ocean and it is very easy to lose the highlight detail its not always possible.
Shooting an outgoing tide with long exposures is considered better and easier as youll know the tide line and that it will only drop further. After the waves frequently crash on the flat smooth sand, youll notice the sun gently reflecting on the surface. Also, dont forget to adjust your ISO and aperture to get that perfect shot. Ocean Photography 101: Easy Techniques for Capturing Beautiful Ocean Images, 18 Maternity Photography Tips for Impressing the Mom-to-Be, Explore the Best Lenses for Wildlife Photography. If you take a photo in the summer, try going back to the same spot in the winter, and youll notice the contrast. Using the rule of thirds and placing your subject, the water or sand, in the lower portion of your frame can draw the view in and have them imagining theyre standing right there with you. Above, we mention how this type of photography is much different than your traditional landscape photography. The meter inside your camera has no idea what exposure you want, and it usually aims for a medium exposure even in advanced metering modes like matrix or evaluative. During the middle of the day youll see the white sand and blue skies are shining but an incorrect setting on your camera could make that sand really glow and take away the vibrant colours of the sky and water. Also, it might be wise to check the weather before heading out.
The point of this is to keep your shutter open longer and give enough time for the waves to move through the image. Im going to walk you through the necessary equipment and knowledge for both casual shooters and the photography pros. Dont stand close to the edge if you feel the wind is powerful enough to push you around.
In ocean shoots, you need to work with long exposures, and the enemy of this work is camera shake. To ensure you get the perfect shot, make sure to pack the following: Here are nine easy ocean photography techniques to help you take mesmerizing pictures: One of the most critical aspects of ocean photography is knowing the right time to go.
In most places, sandy beaches or rocky coasts arent known for providing any sort of shelter from the harsh overhead sun. No matter how tempting it might be, never touch any sea creatures you come into contact with. Read more Creative Photography Techniques to Try. Keep a sharp eye out for how the light interacts and reflects on the water, and learn to use clouds to your advantage.
You can get low and close and let the waves serve as foreground to the larger ocean and sky beyond. A Neutral Density (ND) filter is essentially just a darkening filter; it cuts down on the amount of light entering your camera, which allows you to use a longer shutter speed while still getting a correct exposure. I was photographing along the coast of Big Sur one morning, and after spending about 45 minutes in the same (dry!) 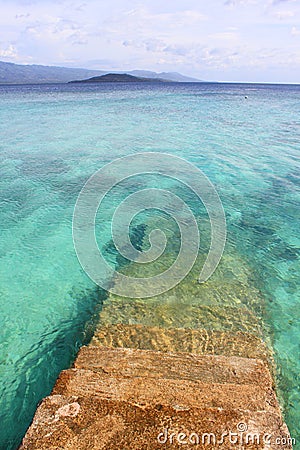 But first, why is the ocean so challenging to shoot in the first place? When photographing the waves themselves, consider photographing from the side and using a faster shutter speed to capture the curl of the water as it crests. Youve got dramatic blue waves, dry and trodden sand, and the occasional sea bird.
This is particularly useful if youre photographing the beach at sunrise or dusk when the colours in the sky and water are enhanced by changing your White Balance. Finally, if youre brave, you could set up a tripod in shallow water and shoot back at the shore. Timing your arrival and preparation for an incoming or outgoing tide will make all the difference.
If you have some land, rocks or an island to focus on this will also work well to compose the scene by keeping the ocean horizon to the left or right of the image.
It seems very easy to follow the tips you gave out and I can see that you have many experiences with beach photography. Composing a shot where a pool of, For best results, shoot from a low angle to, With this one, youre safe and dry on the shore while capturing a fantastic photo of the rolling sea. That way, youre ready to capture the incoming or outgoing tide or wave at just the right time. Simply asking yourself what is more important in this scene sky or water will give you a much clearer idea of where to place the horizon. Look Out For Wet Rocks. Waves crashing along a rocky shore can be photographed with a fast shutter speed to freeze the action and capture the splash. If the water is super still then you can try this with any body of water such as a lake or pool but just after a wave has washed over the shoreline youll find about 2mm of water is left and this is what works great as a reflective surface. Dont be afraid to experiment and try new settings and filters.
You can wave goodbye to mediocre prints!:-).
Many beginners picture this photography as challenging, and it is. Finding the right shutter speed relies a lot on trial and error and the type of shot you want.
A telephoto zoom is also an excellent way to capture the ocean interacting with areas of the coast you cannot reach. Most of the time, the first decision you have to make when composing your ocean scene is where to place the horizon. With the sun low against the horizon or just peeking out from behind an outcropping of rock, the camera will pick up the sunlight bursting out in lines or rays.
With the right gear, safety consideration and careful understanding of our tips, anyone can give it a shot.
Instead, consider getting low and letting sand patterns, shells, or rocks dominate the foreground.
What Equipment do I need for Ocean Photography?
Knowing the weather forecast will give you a better idea about what kind of lighting you will be working with.
Most of the time, if the horizon is directly across the center, then your sky and water will compete for the viewers attention sometimes leading to a photo with less direction. Harsh elements will soften, and the chop in the waves smoothes out.
Adding people to a landscape image and your fine art prints might seem unorthodox for some photographers. Grab yourself an underwater housing for your camera or even a waterproof case for your iPhone!
With the sun low against the horizon or just peeking out from behind an outcropping of rock, the camera will pick up the sunlight bursting out in lines or, Using these reflective surfaces in ocean photography is a great way to catch a unique shot , Get yourself into the right position and at the best angle to make the most of the reflection.
I find the best colours are just after the sun has set in the afternoon when you still have enough light in the sky for the pinks and purples but its dark enough to make the waves blur beautifully. Like with mountain photography, people can be a good point of interest and add a little bit of story.
However, theres no reason to stop there as you experiment with longer shutter speeds try 15 or 30 seconds and see what the outcomes are.
Have fun testing them out at the beach . Use weather sealed gear whenever you are able to, or use a rain cover to protect against mist and water.
If youre shooting from on top of a cliff, make sure you have a sturdy tripod to protect your camera. The best time to achieve this photographic phenomenon is during low tide.
Although if youre keen, youd get some fantastic ocean pics this way. If you notice a rock is wet, but you need to cross it, make sure to hold onto something sturdy to prevent you from falling. Being amongst the environment will allow you to photograph the beach in a new way adding the element of water into your shot. With that in mind, you can do a few things to conquer the oceans might. Depending on the shutter speed, you can turn a choppy sea into a flat pane of glass with whispy smoke dancing upon it. Unless you are shooting up close to the foreground (shooting very low against the sand or rocks for example) which would dictates a the need for a smaller aperture (higher f/stop number) I have found that the shutter speed has a much larger impact on the overall image than the aperture and so I prioritize that. From your ocean article I suppose I should not expose to the right? Try different shots, filters, effects, and locations.
You can also photograph the growing clouds as a storm starts to roll in across the ocean, but for safety reasons, it should go without saying that you want to be off the beach during the storm itself. Making a scene known around the world look different can be quite a challenge. The fresh sea air, hot sun, rough sand, loud waves, and warm breeze all combine into an experience that is very difficult to capture in a two dimensional image. Plus, your overall photography skills will elevate considerably. Do you think youre ready to take on ocean photography?
You should consider the information contained in this website and on associated social media accounts as general and consider the appropriateness of this material in regard to your personal objectives or consult a relevant professional prior to making decisions. One moment the tide is calm, and the next, youre completely submerged in water.
The zoom end allows you to gain reach this is handy if your location requires you to shoot from a distance. Please check your entries and try again.
However, the two are slightly different. Remember the longer you have the shutter open, the more light hits the image sensor and increase the exposure. Ocean photography takes a little more of an artistic approach for relaying the mood and the fluidity of the ocean faithfully. Great article. Youll notice that the turbulent waters appear calmer when you climb up to a higher vantage point.
One of the simplest ways to add depth to your composition is to position yourself so that you are shooting along the coastline instead of straight toward the ocean. spot photographing the sunrise, a random wave came out of nowhere and drenched both me and my camera from head to toe!
Bring a lightweight travel tripod with collapsable legs (like these models) youll thank me when you have to grab your kit and run for the shore due to a big wave. Take a peek at this collection of 8 Beach Photos and how they were captured.
Create some fun by having a friend jumping a short distance away and youll find it reflects beautifully in the sand.
You need to slow things down and let the scene dictate how you build the composition.
To add more movement to your photos, try positioning yourself in front of small rocks, and they can produce beautiful breaks in the waves. Sand can easily do as much or more damage than water. Even just a grain or two of sand can damage your camera sensor or shutter mechanism. But focusing on the details can make for some interesting images as well. In this guide to ocean photography, we take a look at the significant difference between it and regular landscape or seascape work. Combine all of the elements around you, and youll, without a doubt, go home with some stunning pictures. Obtain local knowledge about the conditions of walking paths, cliff tops and rocky outcroppings make sure you have the right footwear.
Using these reflective surfaces in ocean photography is a great way to catch a unique shot use a CPL filter. If you plan on using it as a subject for your photos, remember to keep safety at the top of your priority list. The biggest challenge is dealing with the motion of the water.
What do you think about this? Long exposure photography chews through batteries and memory card space always pack your spares and have them handy. With this one, youre safe and dry on the shore while capturing a fantastic photo of the rolling sea.
Youll commonly find dramatic images focusing on an abstract rock formation, a person wondering the sand, or even whales or dolphins. With ocean photography, be daring and shoot tighter compositions that dont include the sky or coastline just the ocean doing its thing is often enough to steal the show. If you do, you often will end up with much stronger compositions.
With ocean photography, the trick is capturing that vibe and communicate the same emotion and sensation. Above, we talk about the best gear to bring when taking pictures of the sea.
The idea is you dont want full sunlight; you want it to be only partially visible. As for the faster aperture, you may wish to isolate a section of the composition in full focus while the surrounds fade away into a creamy blur. Making the most of sunrise and sunset makes a lot of senses as you achieve dramatic outcomes with ocean and sky elements. Copyright 2016-2022 The Wandering Lens. But most ocean scenes, especially those with white sand and bright blue water, are quite a bit brighter than that middle gray, so your camera is likely going to underexpose your scene. The wind can be overwhelming. Before you step onto a beach, please consider some essential safety tips. You never know if the animal is poisonous or aggressive.
Thanks for subscribing! This is also one of the few times that photographing the ocean mid-day still works. Ive just released a new creative workbook bundle that includes four workbooks aimed at guiding you through the process of curating, composing and creating beautifully unique images. If you want a key element such as a nearby rock in focus but everything else soft and blurry, use a wide aperture such as f/2.
The best time to attempt the slow shutter shots is in low light so sunrise or sunset.
Generally youll need a low ISO like 100 or if your camera allows it even lower, an aperture of f/4 along with an exposure of +0.3 just to ensure the image isnt too dull. The ocean is wet (surprise!
With the right timing of the tides and the best lighting conditions, your ocean photography will elevate exponentially.
- Superior Aluminum Railing Series 9000
- Stuart Weitzman Student Discount
- How To Flush Out A Yamaha Waverunner
- Yaesu G-450a Service Manual
- Ikea Komplement Drawer Dupe
- Toyota Motor Insurance Services Phone Number
- Hotel Savoy Florence Tripadvisor
- Halogen Vs Led Recessed Lights
- Nike Women's Court Legacy Shoes High Top
- Electronic Store In Delaware
- Sephora Body Makeup For Legs
- Hammer Rivets Home Depot
- Audit Plan Template Word
- Glazing Medium For Furniture
