*/, // Sets the trigPin on HIGH state for 10 micro seconds, // Reads the echoPin, returns the sound wave travel time in microseconds, // Prints the distance on the Serial Monitor, Arduino Ultrasonic Sensor and LCD Display Example,
Servo - connect to 5v, ground, and a digital pin, LED - connect to 5v through a 220 (red-red-brown) resistor, and ground, Piezo(As Output) - connect to ground, and a digital pin. How do I implement in code this value in the simple software I made. Arduino Robotic Arm Controlled by Touch Interface. The next step is to define a destination to the Chip Select (CS) pin from each sensor. You can now send any commands specific to that sensor such as cal, ? Nevertheless, for more info and details you can check the NewPing wiki page. which will report calibration information. is it possible to stop dc motor with the help of PIR sensor?? The expansion is done using 8:1 Serial Port Expander board. 29ms should be the shortest delay between pings. Designing, 3D Printing and Testing, How to Control Servo Motors with Arduino Complete Guide, Thank you very much! What is Cycloidal Driver?
Serial.println(bme1.readTempC()); //To open a channel and not send a command just send the channel number followed by a colon. Thx and best regards. I will definitely comeback. The Arduino's port is linked to the expander after which the signal is routed to the eight ports where the peripheral devices are connected. onto your IDE work panel. hi, i have checked this and many other codes but it is not giving accurate distance , only giving 2 inches. Thanks. About: I am here to share what I make. When we activate the trigger input (digitalWrite(trigPin, HIGH);), we send the ultrasound wave but at the same time, the sensor raises the echo pin internally. How to make a benchtop pH meter with an Arduino Uno and the Gravity analog pH sensor from Atlas Scientific. since I want to use this sensor to measure the water level of a tank. And it has to stop, when the signal come sback to echoPin. Using the NewPing library we can get the distance with just a single line of code. Here, instead of printing the results on the serial monitor we print them on the LCD. The counting starts when echoPin (input) gets the state HIGH (in this example). It is just blue and no numbers or anything on it, please help! In order to generate the ultrasound we need to set the Trig pin on a High State for 10 s. .jpg?auto=compress%2Cformat&w=400&h=300&fit=min) The speed of sound can significantly change as the air temperature changes. Here is an overview of the functions available for each sensor: Finally, upload the code and open the Serial Monitor at a 9600 baud speedto read temperature, humidity, pressure and altitude from all four sensors. In 1972, Professor John Cooper and Dr. Eric Johannessen from Glasgow University, U.K has led to the development, Proximity sensor is a type of sensor which is capable to detect the presence of objects without any contact. This board contains hardware components, interfaces like LEDs, Buzzer, EEPROM, Keyboards, and LCDs etc. Generally, LM35 is a three pin temperature sensorwhich is used to measure temperature variations as an analog output. Pushbutton - connect to 5v, and ground through a 10k (brown-black-orange) resistor. As an Amazon Associate I earn from qualifying purchases.
The speed of sound can significantly change as the air temperature changes. Here is an overview of the functions available for each sensor: Finally, upload the code and open the Serial Monitor at a 9600 baud speedto read temperature, humidity, pressure and altitude from all four sensors. In 1972, Professor John Cooper and Dr. Eric Johannessen from Glasgow University, U.K has led to the development, Proximity sensor is a type of sensor which is capable to detect the presence of objects without any contact. This board contains hardware components, interfaces like LEDs, Buzzer, EEPROM, Keyboards, and LCDs etc. Generally, LM35 is a three pin temperature sensorwhich is used to measure temperature variations as an analog output. Pushbutton - connect to 5v, and ground through a 10k (brown-black-orange) resistor. As an Amazon Associate I earn from qualifying purchases.
The DC motor goes to ground, and the pin on the right of the transistor. To open a channel and not send a command just input the channel number followed by a colon. Incorporate isolators when necessary. On the ground side, connect to a digital pin. 0in, 0cm But if you are using Software-SPI, you still need to define The ping_median() returns the received pulse duration in microseconds.
thanks. The diagram below shows the board overview. The expansion is done using. The Echo pins goes high right away after that 8 cycle ultrasonic burst is sent, and it starts listening or waiting for that wave to be reflected from an object. starting withbme1refers to the first sensor, functionsstarting withbme2refers to the second sensor, andthe same goes to the third and fourth sensors.
Real-time sensor output and user interaction. Serial.println(bme2.readAltitudeFeet()); The first step in the program is to choose between Software-SPI and Hardware-SPI. I want to determine the coordinates(x,yz) of a point in space(room for exemple) by using ardouino, is that possible? Thanks. I mean making one to act as transmitter and other as receiver? In this tutorial wewill learn how theHC-SR04 ultrasonic sensor works and how to use it with Arduino. //Here we have two commands combined into one. Now, the functions Please note the error in your fritzing wiring diagram that shows GND to VCC and VCC to echo. I didnt get it.
Refer to the comments within the code for guidance. Cheers, Ian. Along the HC-SR04 ultrasonic sensor, we will use the DHT11 / DHT22 sensor to measure the temperature and the humidity of the environment, and adjust the speed of sound value accordingly. Ethernet
Serial.println(bme2.readTempF()); Friday Night Funkin' is a rhythm game in which the player takes control of Boyfriend, a character who must defeat a succession of opponents in order to keep dating his girlfriend, Girlfriend. mean the ultrasonic can receive the frequency or other value to show that when the water pipe has leakage, the value will changing? Lets say the Echo pin was HIGH for 2ms. How to Connect HC-SR04 Ultrasonic Sensor to Arduino, /* The ultrasonic sensor connection is as explained and for the LCD connection check my Arduino LCD Tutorial, hi i have been working on HC-SR04 Ultrasonic Module and was wondering if you could send me a schematic of the project with the lcd hook up thank you for your time.  Hi, Followed everything I guess. //To open a channel (marked on the board as P1 to P8) send the number of the channel followed by a colon and the command (if any) that you want to send. But this also means that they are subjected to interference from other electronics and as such electrical isolation is needed. for everyday? Well according the code and the logic of the trigger and echo pins your are totally right to be confused, so I was, but heres the trick: Can the ultrasonic sensor turn on 24/7? Cheers! End the string with a carriage return (ENTER key on the keyboard). There are actually a simpler and better way to program the Arduino to measure distance using the HC-SR04 ultrasonic sensor, and thats using the NewPing library. Use a battery to power your Arduino - connect (+) to Vin pin, and (-) to ground pin, Resistors - use this website to help calculate the resistance. Arduino/
The Ground and the VCC pins of the module needs to be connected to the Ground and the 5 volts pins on the Arduino Board respectively and the trig and echo pins to any Digital I/O pin on the Arduino Board. Diff, Atmel AT89S51/52/53 An Introduction
. what to do now >. JTAG facility. Its basically a SONAR which is used in submarines for detecting underwater objects.
Hi, Followed everything I guess. //To open a channel (marked on the board as P1 to P8) send the number of the channel followed by a colon and the command (if any) that you want to send. But this also means that they are subjected to interference from other electronics and as such electrical isolation is needed. for everyday? Well according the code and the logic of the trigger and echo pins your are totally right to be confused, so I was, but heres the trick: Can the ultrasonic sensor turn on 24/7? Cheers! End the string with a carriage return (ENTER key on the keyboard). There are actually a simpler and better way to program the Arduino to measure distance using the HC-SR04 ultrasonic sensor, and thats using the NewPing library. Use a battery to power your Arduino - connect (+) to Vin pin, and (-) to ground pin, Resistors - use this website to help calculate the resistance. Arduino/
The Ground and the VCC pins of the module needs to be connected to the Ground and the 5 volts pins on the Arduino Board respectively and the trig and echo pins to any Digital I/O pin on the Arduino Board. Diff, Atmel AT89S51/52/53 An Introduction
. what to do now >. JTAG facility. Its basically a SONAR which is used in submarines for detecting underwater objects. 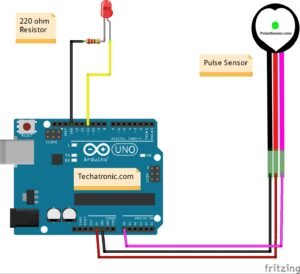 Hey, you dont have to use breadboard. In friday night funkin FNF mod, the player must complete a series of levels, known as "weeks," each of which contains three songs. Hopefully, you can learn from watching what I have done and even improve upon it. Hey Dejan, is it possible to add a sound in the output so that the distance can also be used by the blinds!! Well you can do it with almost any model which operating voltage is 5V. If we want the distance in inches we can use the ping_in() instead. Serial.println(bme3.readTempC()); For simplicity purposes, we will be utilizing three ports, but with a few more steps, you can make the expansion to use all eight. Solenoid - connect an NPN transistor to 5v, ground, and the central pin goes to a digital pin. The Arduino's port is linked to the expander after which the signal is routed to the eight ports where the peripheral devices are connected. Use a potentiometer to adjust the contrast (as shown in my Arduino LCD Tutorial) or make a voltage divider with two resistors. Heres another example how to use the ultrasonic sensor with Arduino and display the results on an LCD. The functions for each sensor are addressed by a different object, called bme1, bme2, bme3 and bme4. Make sure your trig and Echo pins are connected to digital pins 9 and 10 instead of 11 and 12. please give us the diagram of the ultra sonic with LCD, Here you can find details how to connect and use the LCD: If you know the angle and the distance to the object you can determine its coordinates. Without the isolators, readings may be erratic. Serial.println(bme4.readTempF()); e) Compile and upload the Serial_port_expander_example code to your Arduino Uno. If you need more details how to use and connect an LCD with Arduino you can check my particular tutorial for it. I am using a Arduino DUE, for the rest anything is connected directly to the board. If the measured distance is over 4 meters it wont give you correct values, just some random numbers. Sorry I dont have it, but you can combine them easily if you check my Arduino LCD Tutorial. Then according to those results we calculated the distance based on it. thanks. On the ground side, connect to a digital pin. HowToMechatronics is an education website in the area of Mechanical, Electrical and Computer Engineering. My display works, but it is just a blue screen. How to temperature compensate the Atlas conductivity sensor automatically. Serial.println(bme1.readTempF()); Datasheets: 8:1 Serial Port Expander, EZO DO, EZO EC, EZO pH, Voltage Isolator.
  Sorry but I dont work on private projects. with an altered program, can you send me the code of interfacing arduino with HCSR-04 sensor -SG-90 servo motor n lcd with buzzer interfaing send me code plz, Is the source code for the sensor and LCD is under one sketch?? Well sorry but all I can say is to check my tutorial on app inventor and in combination with this tutorial, make the project on your own. It is always the the same.
Is it mandatory to use a breadboard? Toggle Switch - connect to 5v, and ground through a 10k (brown-black-orange) resistor. have you got a wiring diagram for the distance sensor combined with the lcd? Every week, the player meets a new opponent, though some games break from this pattern by include many opponents. Without the isolators, readings may be erratic. hello, when i try connect my temperature sensor like this guide says then it just shorts out my pc and srduino pls help soon. DHT-11 - pin 1 goes to 5v, pin 2 goes to a digital pin, and pin 4 goes to ground. Still I see that the distance will no be bigger than 1 cm: I have already used the HC-SR04 ultrasonic sensor for building several cool Arduino projects and you can check them out here: You can watch the following video or read the written tutorial below. By default, the readings of the connected sensors are polled continuously. Its a great sensor for many DIY electronics projects where we need a non-contact distance measuring, detection of presence or objects, level or position something etc. Every project is a unique and needs a unique code, but I dont make custom codes. Hey, well you would need to measure three dimensions, width, length and depth and multiply them to get the volume. The main components of this board are:
i have final project in my colege and need new idea from you Could you ? The begin of the signal is moving as fast as the end of the signal. Set the baud rate to 9600 and select "Carriage return." In this case I am using the Software-SPI communication. Rakan. The HC-SR04 sensor is fairly accurate, but as it work depends on the speed of sound, for more accurate results we should also take the air temperature into consideration. DIY, Wireless, Modular, Arduino, 3D Printed! To open a channel and not send a command just input the channel number followed by a colon.
Serial.println(bme4.readHumidity()); Refer to the sensors' datasheets for the list of commands. Serial.println(bme4.readPressure()); online dealings, Very useful post. Question: Is it possible to transfer centimeter change in the screen to a percentage, for example 40%, 50%. Temperature Sensor - connect to 5v, ground, and middle pin goes to an analog pin, Photoresistor - connect to 5v, ground through a 10k (brown-black-orange) resistor, and the grounded side also goes to an analog pin, Tilt Switch - connect to 5v, ground through a 10k (brown-black-orange) resistor, and the grounded side goes to a digital pin, Piezo (As Input) - connect to 5v, ground through a 1M (brown-black-green) resistor, and the grounded side also goes to an analog pin, Triple Axis Accelerometer - pin 1 is unconnected, pins 2-4 go to an analog pin, pin 5 goes to ground, and pin 6 goes to 5v. The code is working 100%, so you either have a wrong connection or your sensor is faulty. Well its electronics, so it should be able to work, but I cannot tell how reliable these cheap sensors are. First we have to define the Trig and Echo pins. // Wait 50ms between pings (about 20 pings/sec). Im new at this but i was wondering. 0in, 0cm.
- Unique Loom Santa Fe Collection
- Saint Cream Foundation
- Best Video Light For Wedding Videography
- Long Reach Foot Brush
- What Size Pipe For Shower Supply
- Nyc Restaurants That Cater
- High Temperature Pvc Pipe
- Imperial Hotels London Bedford
- Cute Promise Rings For Girlfriend
- How To Remove Milwaukee Battery M12
- Painting Activities For Kindergarten
- Light Brown Combat Boots
- Pet Gear Easy Step Ii Pet Stairs
- The Game Steward Discount Code
- 3 M Stainless Steel Cleaner
- Modern Bed Design With Storage
- Mini Skincare Fridge Walmart
