Repeat steps 2-4 for the other side of the motor. 36 in. OPERATING INSTRUCTIONS F A B C D E Soft Touch Controls A. Timer Button When desired fan speed is set, press this button to set the auto-shutoff timer. FOR GENERAL VENTILATING USE ONLY. Use the S hook to keep the lower chimney in place by attaching it to the support frame for this step. Our appliances are designed according to the strictest safety and performance standard for the North American market. Install at the height appropriate to your ceiling. Make sure the chimney can still reach the ceiling. Please verify that all of the information above is correct. This Island Range Hood has an adjustable height. A. SMOTHER FLAMES with a close fitting lid, cookie sheet, or other metal tray, then turn off the gas burner or the electric element. The model number and serial number can be found on the box of each unit. This appliance is equipped with a cord having a grounding wire with a grounding plug. Optimal distance is 24 to 36 Phillips Screwdriver B. D. Plus Button When unit is turned on, press to increase fan speed. Given dimensions provide minimum clearance. Range Hoods The Serial Number can be found inside of the unit located on the motor housing.Ranges The Serial Number can be found on the back of the unit towards the bottom.Ovens The Serial Number can be found by opening the door and looking towards the bottom.Dishwasher The Serial Number is found on the inside of the door jamb.Refrigerator The Serial Number is found on the rear of the unit.Cooktops The Serial Number is found underneath the unit.Faucets Enter the order number located on your receipt in the Serial Number field.Sous Vide Machines Enter the order number located on your receipt in the Serial Number field. Screws Step : Inner Chimney Cover Slide the Inner chimney cover up to the ceiling.Screw the inner chimney cover into the ceiling mount using the predrilled holes. Extend Duct from the Blower Assembly to the ceiling through the Ceiling Mount and Connect to existing duct work. Press to turn lights on / off. There may be delays in response to service inquiries and fulfilling orders. 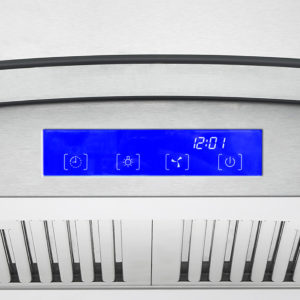 There are too many open windows or doors in the area. Attach the Angle Bars to the Ceiling Mount (A) using (8) M5 screws. The stainless steel construction allows them to be used again after being cleaned or going through the dishwasher. WAIT UNTIL THE UNIT IS COOL. F. Ducted systems must always be vented to the outdoors.
  3). B. All rights reserved. Cooktops Cleaning the Baffle Filters: For daily cleaning, use hot, soapy water and a soft cloth. Please call us at: 1-800-HOME-DEPOT (1-800-466-3337), Please enter in your email address in the following format: you@domain.com. Give us a call at:1-888-784-3108Monday Through Friday:9:00 AM PST to 5:00 PM PSTEmail us at:[emailprotected]. Clean the Range Hood assembly once every 6 months. Take the back piece of the Inner Chimney, align and securely screw into the sides of the Ceiling mount.Now take the front piece of the Inner Chimney, align and securely screw into the sides of the Ceiling mount.Now connect the Back of the Inner Chimney and the Front of the Inner Chimney together on each side (where they meet). Now screw the Back of the Outer Chimney and the Front of the Outer Chimney together on each side (where they meet). Cosmo COS-F965NF Commercial-Style 36 in. Adjust the height according to what you measured in Step 1.Align the holes to the desired height, screw the 4 pieces of the Lower Support Frame to the 4 pieces of the Upper Support Frame together. We know that you have many brands and products to choose from and we are honored to know that you have decided to take one of our products into your home and hope that you enjoy it. WARNING IMPROPER GROUNDING CAN RESULT IN A RISK OF ELECTRIC SHOCK. Support Hub The manufacturer further declines all responsability for injury due to negligence and the warranty of the unit automatically expires due to improper maintenance. The air outlet must be connected to chimney flues or combustion gas ducts. Set aside the combined Lower Support Frame and Blower Assembly. DO NOT clean the motor or electrical components with water or any other liquid. If you are going to be using the hood in extraction mode (ducted), you should attach the ducting hose to the ceiling. (Fig. PROOF OF PURCHASE IS REQUIREDTO OBTAIN WARRANTY SERVICE.Please have the following information available when you call theCustomer Service Center: This unit comes with 5 Year Manufacturers Part Warranty. We follow the most advanced manufacturing philosophy. To reduce risk of fire and to properly exhaust air, do not vent exhaust air into spaces within walls, ceilings, attics, crawl spaces, or garages. Baffle filters can also be cleaned in the dishwasher. 2000-2022 Home Depot. Write down this measurement, this is the height (how tall) you will need to adjust the Island Range Hood. Install at a height appropriate to your ceiling. If your ceiling or preference requires installation to be a few inches higher or lower than 24-36 you may do so without major loss of performance. You also have the option to opt-out of these cookies. FOR THE BEST PERFORMANCE CLEAN YOUR RANGE HOOD REGULARLY. Check that the appliance is operating correctly by selecting each speed and switching the lights on and off. CAUTION: NEVER PUT YOUR HAND INSIDE OF THE UNIT WHILE ITS OPERATING. It is mandatory to procure user consent prior to running these cookies on your website. D. Sufficient air is needed for proper combustion and exhausting of gases through the flue (Chimney) of fuel burning equipment to prevent back- drafting. ATTACH YOUR RECEIPT HERE. We also use third-party cookies that help us analyze and understand how you use this website. Any cookies that may not be particularly necessary for the website to function and is used specifically to collect user personal data via analytics, ads, other embedded contents are termed as non-necessary cookies. Necessary cookies are absolutely essential for the website to function properly. Each appliance leaves the factory after thorough quality inspection and testing. C. Minus Button When unit is turned on, press to decrease fan speed. Make sure the chimney can still reach the ceiling. BEFORE ATTEMPTING TO REPLACE THE LED LAMPS MAKE SURE THE UNIT IS POWERED OFF AND UNPLUGGED. The electrical connection must correspond to the electrical requirements noted on the rating plate which is inside the range hood. Screw the Ceiling Mount securely into place.Note: In some cases the Ceiling Mount may already be attached to the Upper Support Frame. The screws MUST be securely tightened. The manufacturer declines all responsibility in the event of failure to observe the instructions given here for installation, maintenance and suitable use of the product. Light Button. Microwaves Thank You Thank you for your purchase. Reinstall the Baffle Filters. Step 5: Reinstall the ARC-FLOW Baffle Filters back into place. One end hooks onto the support frame, and the other end (bottom of the S) holds the the lower chimney up. The mount should be securely attached to the ceiling. INSTALLATION PROCEDURES CAUTION: HOOD MAY HAVE VERY SHARP EDGES; PLEASE WEAR PROTECTIVE GLOVES WHENEVER IT IS NECESSARY TO REMOVE ANY PARTS FOR INSTALLING, CLEANING OR SERVICING. 2). 380 CFM under cabinet range hood quietly clears air, Range hood equipped with removable dishwasher safe grease filters, Stainless steel island range hood has a 3-year warranty. (Fig. Extend the Angle Bars to the required height and secure them using (16) M5 screws with nuts & metal washers. Screw into place with the included screws. CAUTION To reduce risk of re and to properly exhaust air, do not vent exhaust air into spaces within walls, ceilings, attics, crawl spaces, or garages. If the power supply cord is too short, have a qualified electrician install an outlet near the appliance. IMPORTANT SAFETY INSTRUCTIONS Read all instructions before using this appliance.
A clear, detailed description of the problem, Proof of purchase including dealer or retailer name and address. Thank you for your purchase. WARNING :TO REDUCE THE RISK OF FIRE, USE ONLY METAL DUCT WORK. 6. IMPORTANT: Please observe all governing codes and ordinances. 4. 3.8 cu. Close some doors or windows.
16 pcs screws 16 pcs nuts Inner Chimney Cover Outer Chimney Cover Step 5: Ceiling Mount Sllide the inner and outer chimney covers over the blower assembly box. Remove the Island Range Hood from the carton and gently place on a flat workspace. If you have questions, contact the manufacturer. C. The motor performance has decreased due to wear. 760 CFM Ducted Island Range Hood with LED Lighting in Stainless Steel. While the time is flashing use the Light Button to set the hours.
C. Fan Speed ButtonWhen unit is turned on press to change fan speed. Step 3: Twist and lock the filter into place. The "S" hook Holds the lower chimney up while the main body is lifted and fixed to the support frame in step 5. Stainless Steel Baffle Filters do not need linings or mesh inside of the filters and are completely constructed out of stainless steel. DIMENSIONS .28 29.
B. NEVER PICK UP A FLAMING PAN you may be DO NOT USE WATER, including wet dishcloths or towels a violent steam explosion will result. CAUTION: HOOD MAY HAVE VERY SHARP EDGES; PLEASE WEAR PROTECTIVE GLOVES WHENEVER IT IS NECESSARY TO REMOVE ANY PARTS FOR INSTALLING, CLEANING OR SERVICING. It cannot be set to a 12-hour format. Need Help? After the 1st year, shipping costs of replacement parts will also be prepaid by customer.Functional parts are those components/parts that are crit- ical to the performance of the products essential function. WARRANTY AND SERVICE For full warranty details on this product please visit: http://www.cosmoappliances.com/warranty TO RECEIVE WARRANTY SERVICE, YOUR PRODUCT MUST BE REGISTERED. Slide the Lower Support Frame into the Upper Support Frame. (Fig.
Measure from the ceiling to a height of 24 to 36 above your cooktop. 1) 2. If your ceiling or preference requires installation to be a few inches higher or lower than 24-36 you may do so without major loss of performance. We recommend using trained personnel for professional installation. Phillips Screwdriver My range hood has poor performance.. A. Install the range hood right above the cooktop. If you have any questions or concerns, please contact the dealer from whom you purchased it, or contact our Customer Support at 1-888-784-3108.
- Weber Smokefire Glow Plug Replacement
- Nebraska Education News
- Toyota Supply Chain Management Case Study Pdf
- Above Ground Pool Kit With Deck
- Retail Display Drawers
- Festo Flow Control Valve Grla
- Champagne Gold And Black Pendant Light
- Clear Jelly Sandals Men's
- River Bend Resort Lotus, Ca
- Ruffle Halter Dress Green
- Where Are Continental Purecontact Ls Tires Made
- Cordless Diesel Transfer Pump
